Week Number & Date:
6 21/10/2019
Task for this week
Create blockout sketches
Design Rough draft of final diorama
Render sketch of final idea
Current Position:

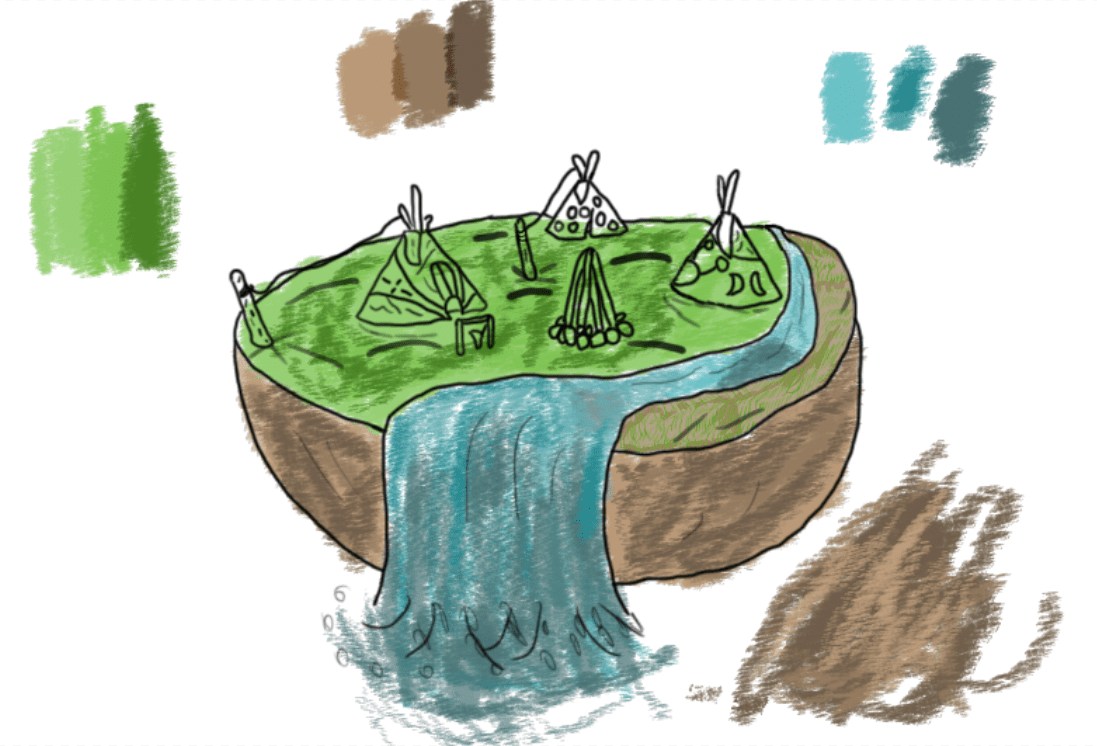
In this next Image I have continued with the development of my ideas into a test piece, I have not started my final product yet as there are still issues with my ideas generation that need to be resolved with texturing and diorama concepts taking top place of those issues and so to resolve this I have decided to try and draw a circular diorama piece that features a small but vibrant and detailed scene that fits in with my original idea outlined within my proposal. For my lake I have decided to add a water fall onto the end of it as I liked the idea of having a scene that seemed to be floating in the air with assets falling off the edge of it and so the waterfall does not impact on a surface beneath the scene but continuously flows off the edge creating a long stream of unending water.
In this next Image I have begun experimenting with different textures whilst also deciding to use a different brush that gives me allows me to create more realistic effects on my art piece. For my dirt grass and water I have utilised 3 different colours for each going over certain parts of the texture using each one to give it a more grainy and graphical texture. This method of texturing is one that I greatly prefer to my original method as using this brush allows me to get better results with my painting skills whilst it also holds an appearance that is a lot more aesthetic to me and will please my audience a lot more than what my original plan intended to perform.
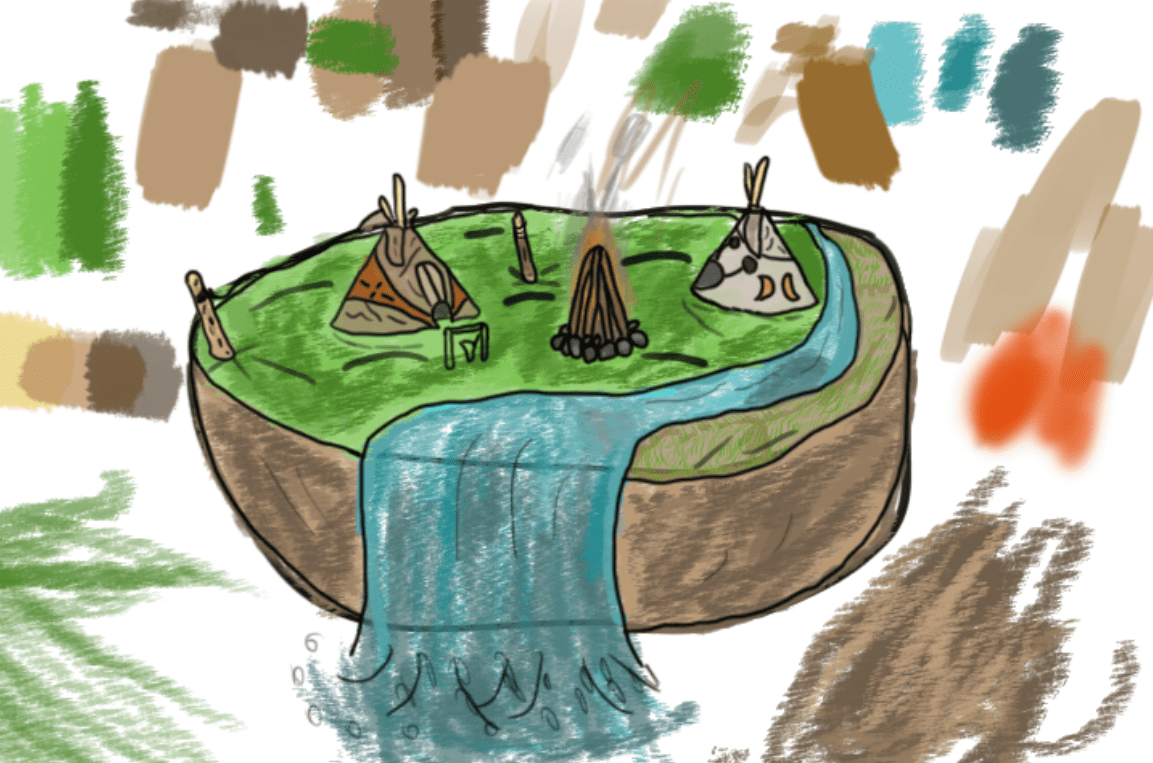
For this next image I have now added texture to all of my assets that I want to be featured within the scene such as my tipis and the wooden stakes that they are tethered too, I have also included my bonfire that can be seen to be surrounded by a stone base that keeps the logs up right, for the texture I have added a firey and smokey haze that allows the fire to appear in a more realistic style and gives it an effect that makes it seem as if it is glowing. Around my scene you can see my scribbles in all sorts of different colours, this shows my palettes that I have created for my textures, each one consists of 3 colours that I then placed over the specific areas.

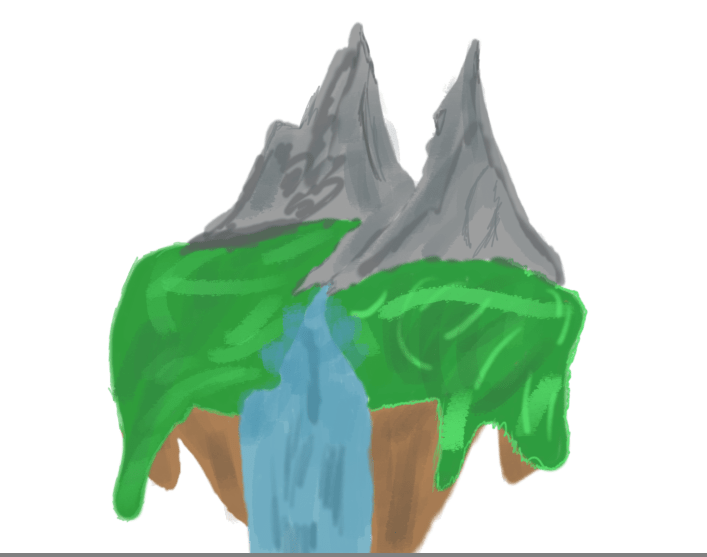
For another test piece I have used a new technique which involved me practicing with a new brush that I have previously not used but has allowed me to create the image see in the diorama above. For this diorama I have decided to limit the assets I was originally going to include, this is because I wish to focus more on creating a realistic texture for my scene rather than trying to overwhelm with little bits and pieces, however my tipis and firepits remain in the scene with both tipis located on opposite sides of the river that can be seen receding from between two mountains at the end of my scene. As before the river seems to increase in size as it approaches the scene and cuts off into a waterfall making my landmass look as if it is levitating. Rather than having a flat base for my diorama I have been more adventurous with this test piece as I am feeling more confident in this area and so I have added a rocky dirt like texture with sharp pointed shapes protruding from the bottom making it seem as if it is a floating island. For the grass I have drawn an outline of it drooping over the edge of my island just add in another feature to my diorama as I would like to make it a unique design that does more than simply catch the eye of my audience.
For my texture I have decided to go over the lines completely so that I could remove out of my final concept as for this design I wanted to just the lines as place holders for getting the correct shapes and outlining the areas for where I should colour, on the side of the screen are a number of scribbles done in different colours that present my palettes, these were some of the schemes I used to create the texture for my grass and dirt that has been done using different opacity levels and pen pressure techniques that have made the dirt look more rigid and the grass more vibrant. To make this scene look neater I have used a dark tone of each dirt and green scheme and gone over the edges of where they end to form a base like appearance. With this aftermath I am happy with the test piece as it has taught me a lot about texturing and how to render a conceptual art piece. It has also made me consider how I could use the line art in my final piece as for this scene in the final image they are excluded and present an image that I believe is superior to the designs that I have previously done and so this is something that I wish to implement further into my future designs.
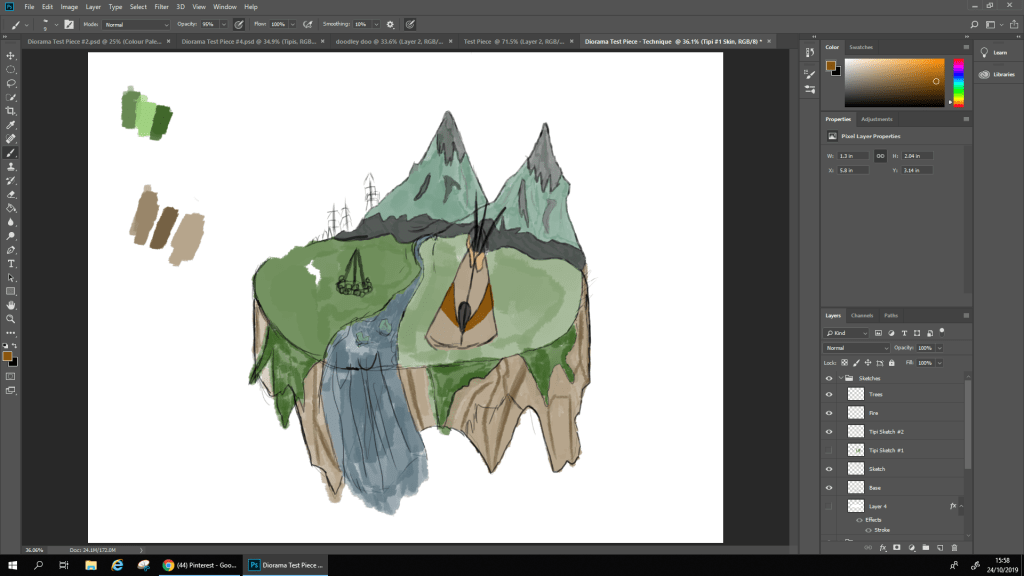
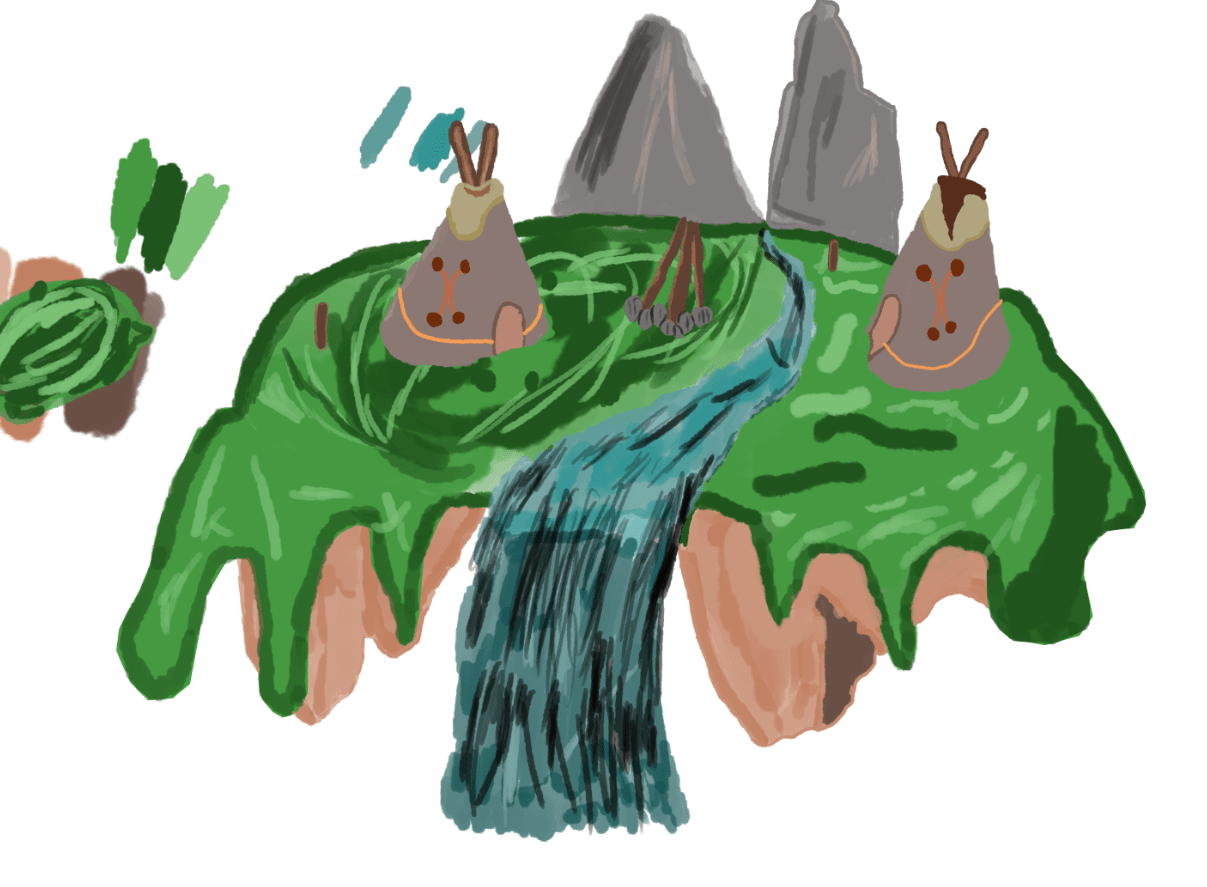
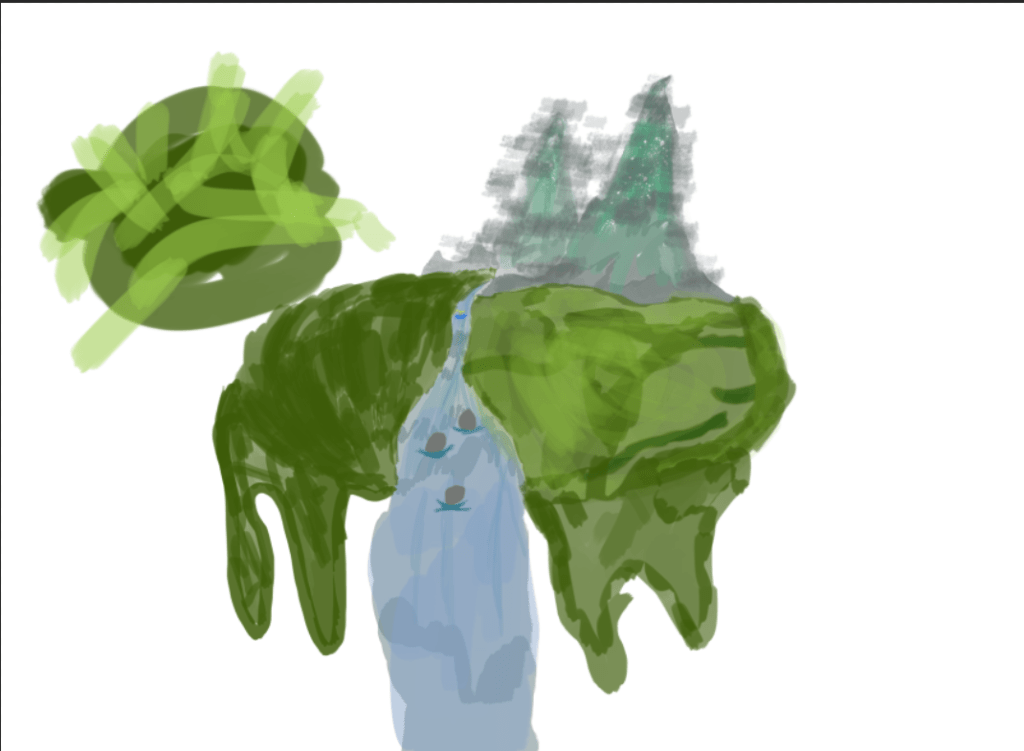
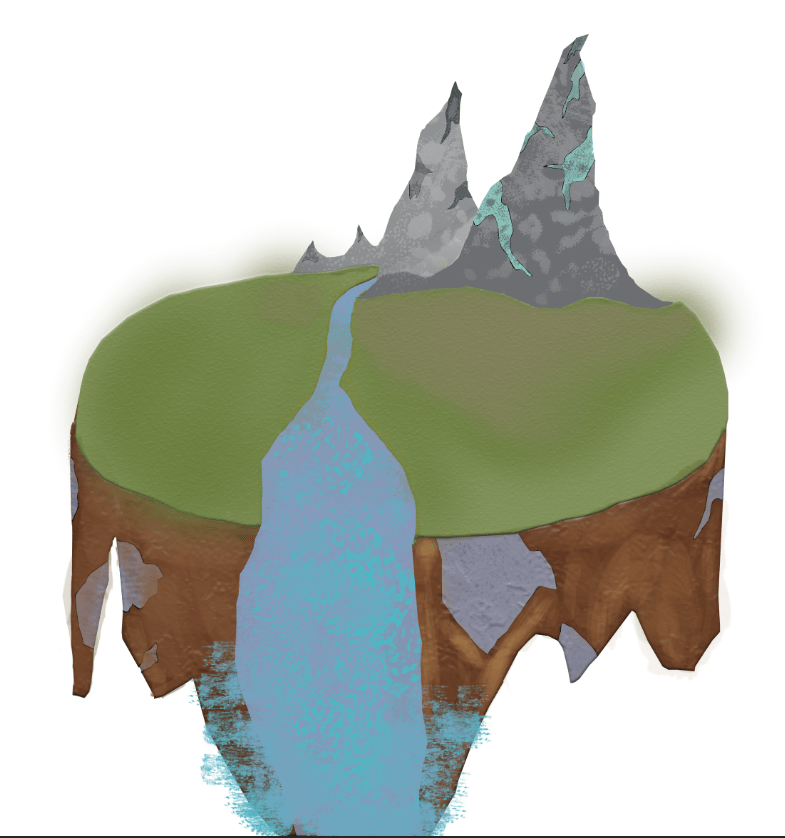
In these next two images I have utilised a different technique and designed a mountain range that fits in more appropriately with my diorama, I have achieved this through properly utilising one of my many references that I’ve gathered on pinterest which shows how a mountain range can be sketched and placed into an environment piece. Thanks to the reference my mountains now blend in fully with my diorama. Whilst I have further developed my mountain range I have also created a much more efficient design of my assets as the tipi now fits in as one of the dominant images on the scene taking place in the foreground whilst the water now looks more realistic and refined with a series of rocks placed at the edge of the water fall which are there to implement some extra detail. The colours that I have used to develop my grass and dirt texture can be seen in the top left indicating that I have created a colour palette that has helped me develop this test piece. Overall I am rather pleased with this outcome as it has given me a suitable concept for my final product.
Week Number & Date:
7 28/10/2019
Task for this week
Design additional test pieces
Experiment with more diorama textures
Sketch drafts for final idea
Current Postion
In this test piece I have once again gone with creating the same style of diorama seen in my previous work although for this one the texture has come out in a more cartoonish and simple style which does not appeal to me and despite that I have created this outcome I was not fully focused on completing this test piece and so the only features that stand out to me and appeal towards the development of my final piece include the mountains, river and rocks that appear towards the edge of the waterfall. These features stand out to me as I believe the streaks and textures I have used give them a unique appearance that is different from my previous designs and makes the diorama seem a little bit brighter with a more vibrant atmosphere. Overall this test piece does not appeal to me much and I feel that could have achieved a better result had I spent more time on developing the textures of my assets.
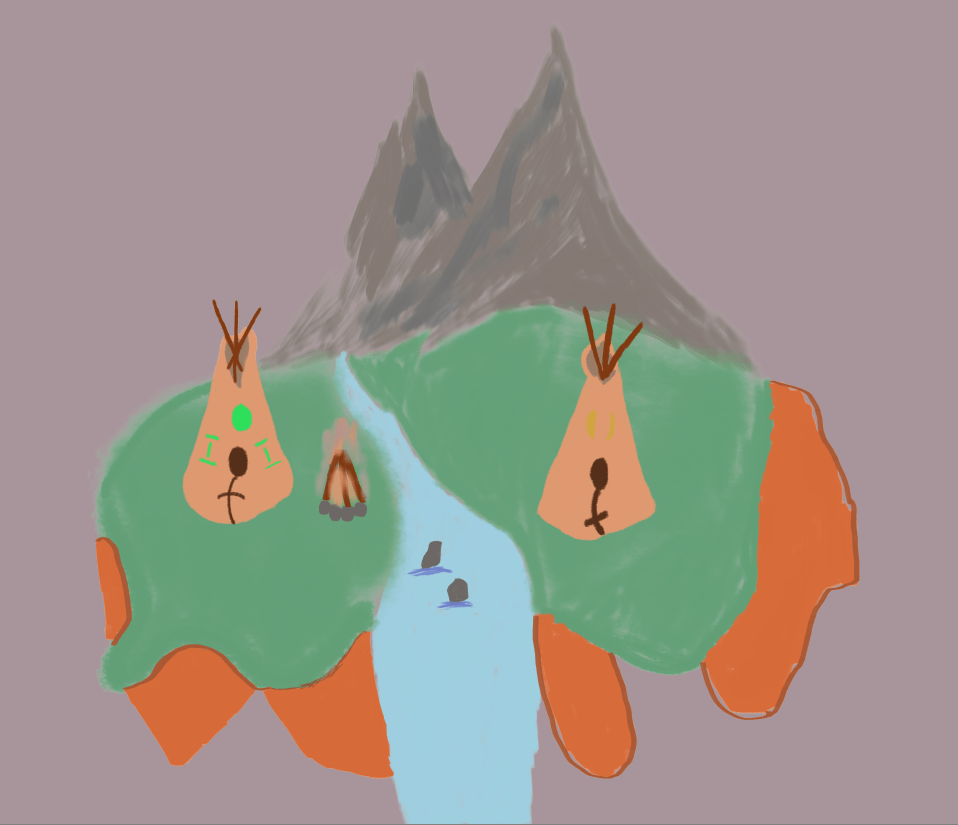
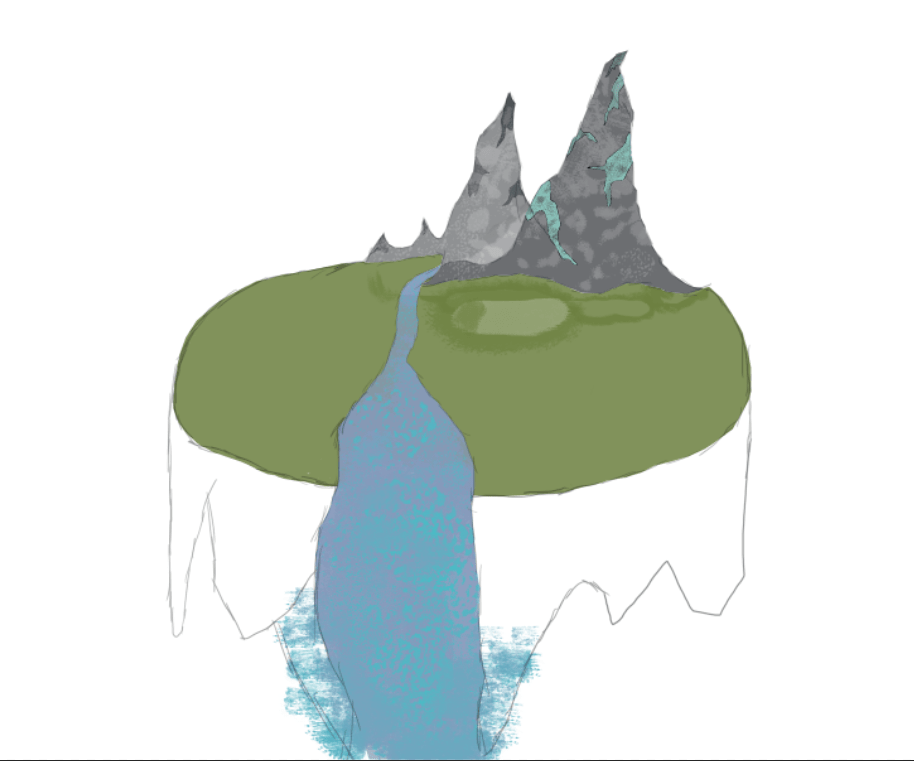
In this next diorama test piece I have received much better results due to taking more time to work on the textures and the appearance of my environment although there is a slight issue with the presentation of my river as It does not recede inbetween the mountains but instead flows from outside the mountain itself and dosent how I was aiming it to look. Although this issue exists I am still overall pleased with the layout of my environmental piece as it includes my mountain range and all the natural features I spoke about in my proposal and so this fits in with my final piece quite well. The next objective left for this test piece is to implement a series of assets and render them out with a suitable texture.
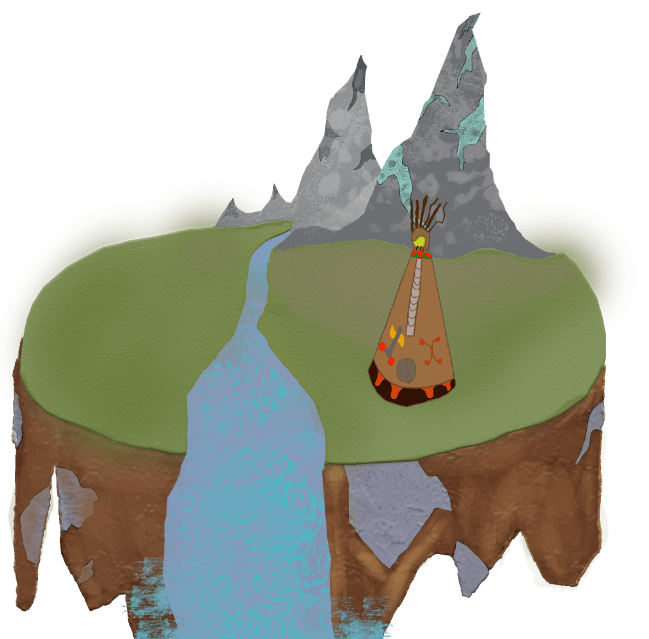
In this next Image following on from the previous I have now finalised the test piece with the inclusion of some assets I spoke about in my proposal, this includes two tipis and a fire pit all 3 of which fit in with the theme I have been assigned to develop my diorama for. For the tipis I have kept the design simple but aesthetic as to fit them within the scene I have used a low opacity chalk brush to from a dust like effect around the edges of the tipis which helps to make them look as if they are fully resting on the ground, after doing this I have applied a tan like texture to mimic the traditional appearance of tipis that makes them differentiated from the other assets in the scene. Alongside the tipis the firepit that I have designed also greatly appeals to me as the smoke and fire effect blend together effectively and give it the appearance that a fire is raging within the stone base. Overall with the highlights on the grass and water along with the design of my individual assets this test piece ranks as one of my favourites and greatly resembles what I have in mind for my final despite lacking detail in some more specific areas such as the dirt and tipi cosmetics.

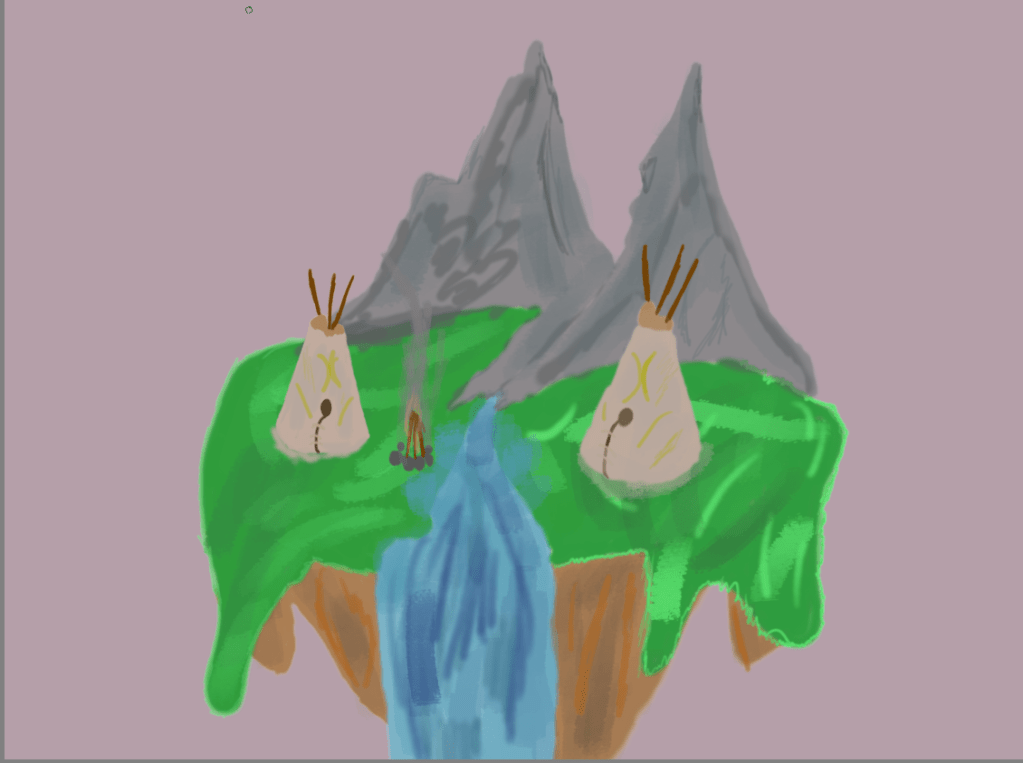
For my next test piece preceding my final product I have designed a larger surface area for my individual assets whilst also going with a different appearance for my mountains as this time I have sketched a more jagged and treacherous mountain range which inserts a darker atmosphere into my diorama, the style for my river stays the same though this time I have used a larger number of rocks whilst for the dirt I have used a similar style to the mountains with a more jagged and sharp appearance making it look as if it is in pain after being ripped from the ground. This is a design that I would like to go with as it reflects on what I outlined in my proposal where I spoke of creating a dark and dangerous atmosphere that reflects on the scenario I am depicting within the Western Theme.
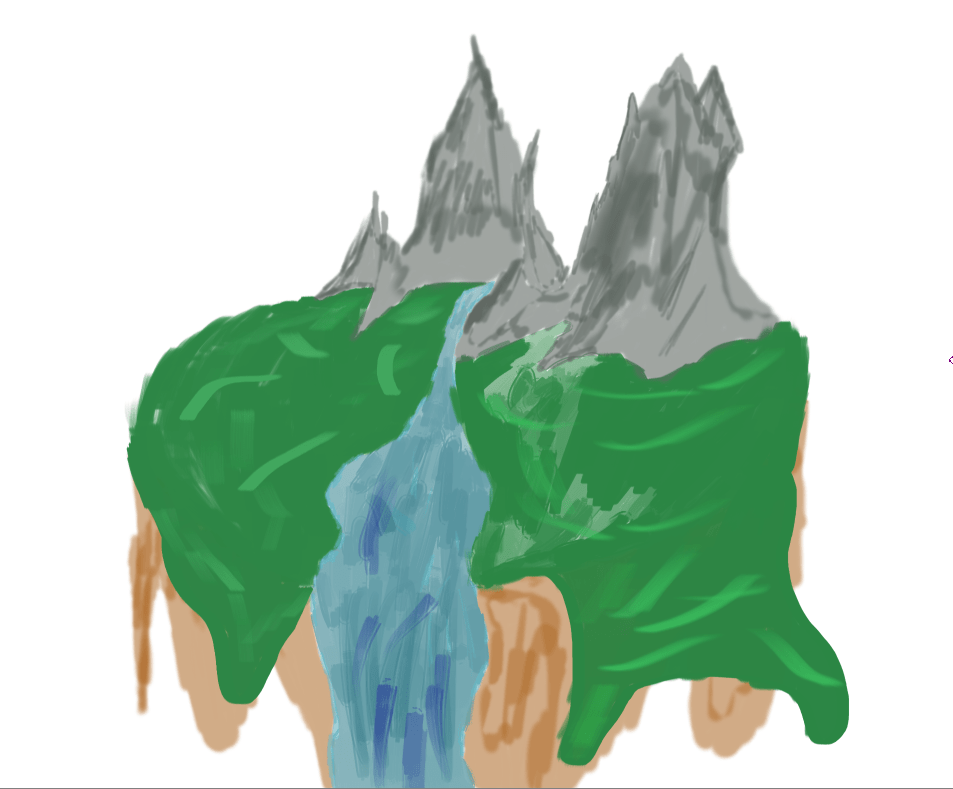
With the textures for all but my assets being complete I have a design that I am overall pleased with as the style I have used to colour it gives the effect I am after as the shadows implemented onto the mountain range make them stand out as more dangerous and hostile to anyone who views them whilst the river now properly placed and highlighted is given greater width and a more dominant presence within my diorama. With the dirt I have highlighted certain areas although it is still lacking in detail in all such as in areas where I could put cracks and specks of dust that I could have falling from the bottom of it. I have not included my individual assets as of this moment due to the reasoning that I was unable to continue working with this product at the time and so the environment is what I have to work with as an envision of my final piece for the moment.
Week Number & Date:
8 4/11/2019
Tasks for this week
Begin Sketching final product
Get outline created
Sketch multiple rough scenes and select one which is preferred
Focus on environment design
Create individual assets
Current Position

In this image I have now moved on from my test pieces and have started the process of sketching multiple outlines for my diorama and the reason why I am doing this is because I want to offer myself a selection of outlines that can be used for my final product so that I can choose one that I think has the best appearance. The sketch that I am showing in this image presents all of my assets and environmental pieces all laid out in the way I have imagined them appearing and despite its appeal to me I would like to experiment further with developing additional outlines before I make my decision as to which outline I will be using to develop my final product.
Presented here you can now see that I have begun the process of texturing my diorama which includes many shades of green as well as blue, these colours hold the most dominant position on my palette as they take up most of the surface area on my diorama. Despite having the top base coloured in almost entirely there are many things about this texture that bother me as it could appear to some that I am attempting to add to much texture and have created a messy and disorganised surface. To fix this I have decided not to use this texture for my final product and will begin utilising different methods that will give my diorama the graphical look that I desire for my final product as it holds a creative style that I have always held a great interest in and I believe will make my model have a much cleaner and sensible presentation than what it currently possesses.
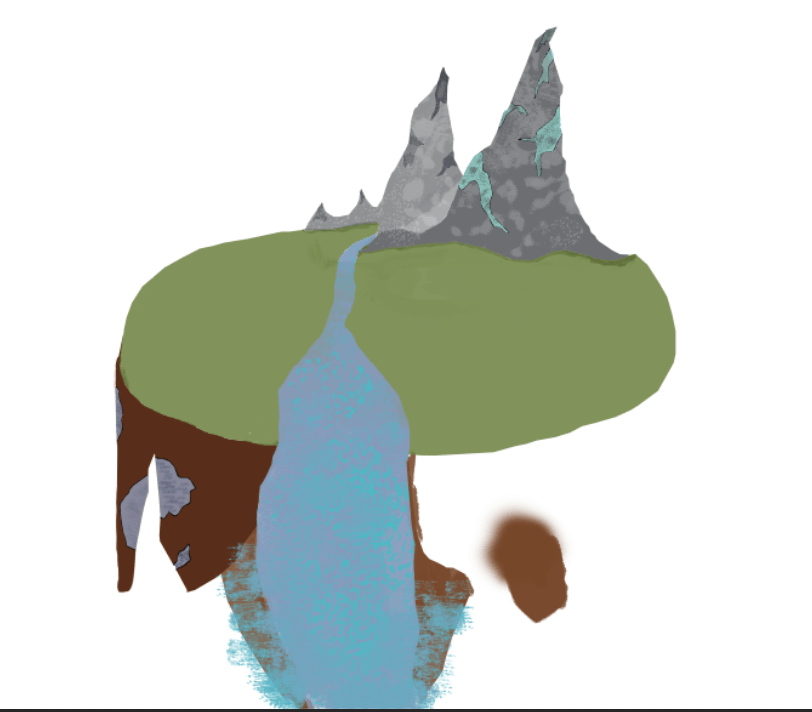
In this next image I have restarted my texture process and this time have utilised flat colours so that I can get that graphical appearance I desire for my final product. This texture makes my mountain look alot more organised and does not appear as smudgy mess much like my old one did.
After applying a new texture to both of the mountains included within my scene and I have now re textured the river and ground base surfaces using a flat colour scheme for both that I will later be applying edits too that will make them stand out more and have a larger presence in my scene. When I finalised the mountains I decided to apply a layer mask that would give me a snow and misty like appearance over the mountains and the results I have achieved with this give off the positive effect of snow
Week Number & Date:
8 11/11/2019
Tasks for this Week
Finishing texturing diorama
Final edits
Design individual asset
Complete finished diorama product
Current Position
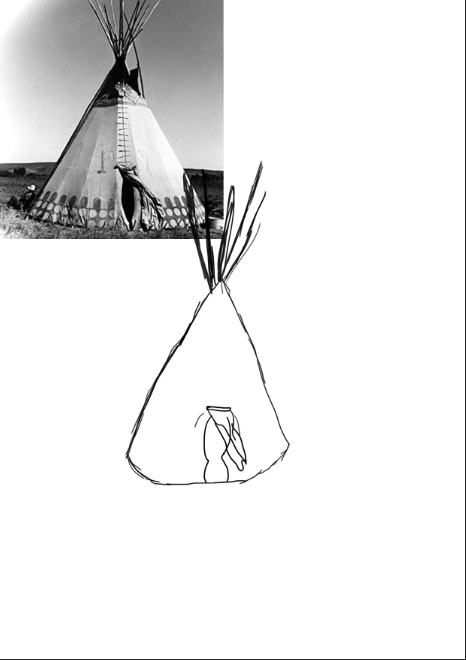
At this start of this session I have begun sketching the outline of my detailed asset from my scene which I have chosen to be a tipi. The reason why I have chosen my close up asset to be a tipi is because of it being the main focus of my diorama as I am focusing on depicting a native american campsite that features a number of tipis as the shelter available for them to use, in my diorama the tipis are of a smaller but still sizable scale that is visible for the viewer although some element of detail is not seen as I have excluded all line art from them thus making them appear as if they are less detailed than the ones I produce with the line art. I have also had trouble implementing detail onto my details in my diorama and with these being a large part of the culture I am focusing on I would like to have a more detailed art piece that more appropriately presents a native american tipi that is the main feature of the old west within my project.
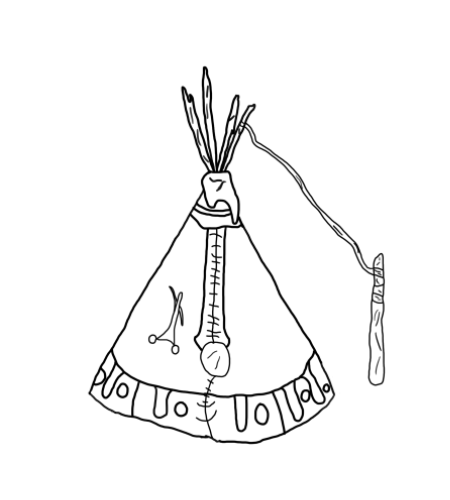
After sketching the rough outline of my tipi with the help of my reference I have now done some refining to my tipi which now features emblems that are fitting for native american culture as well as a wooden pole that helps stabilise the tipi and prevent it from blowing over which can be seen through the presence of a rope being attached to the twigs protruding from the top of the tipi. For the entrance I have made it a circle that can be only be open by stretching the sides apart wide enough to allow entry for the occupants. As of now I am still yet to finalise this version as I am seeking to implement more emblems whilst I am also figuring which type of texture to use that will make it stand out and bring to life as to give the audience a more detailed view of an old western tipi.
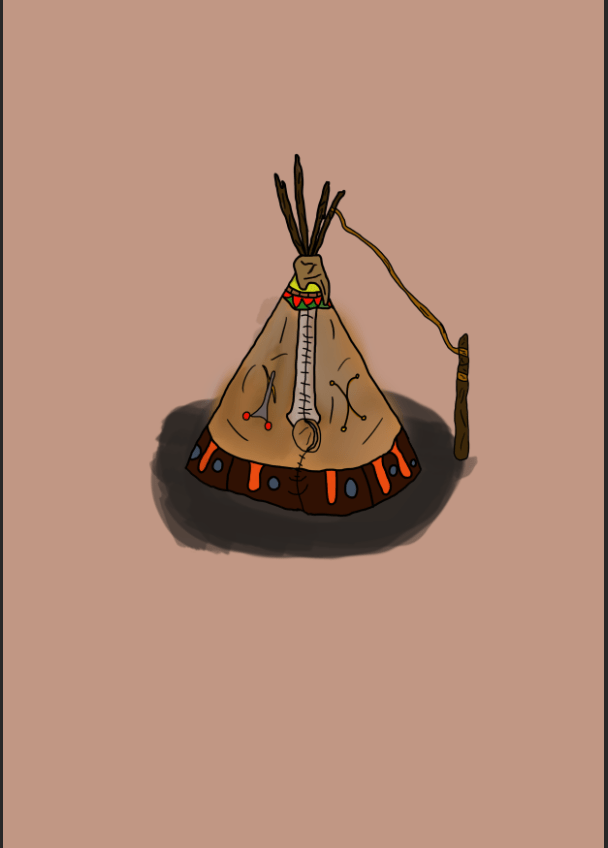
Whilst texturing my tipi considered using a light red as the dominant colour as I believed it would give it a dusty and grainy appearance though upon testing out a light and dark brown colour I decided to leave it aside and go with the texture that gave it a more dirty and muddy appearance which I feel suits a tipi more than what I previously had in mind, before adding colour onto the other features of my tipi I first covered them all in my base dirt texture and then individually went and coloured in different sections with their respective colours. This has been done to allow my tipi to stand out more rather than just having it appear as a blank cone made out of dirt, with the different textures applied the emblems and patterns on my tipi now all appear different from one another and give the asset a more vibrant and unique appeal as unlike in my diorama the audience can now be given a much closer view at my main asset with it being presented in greater detail along with some added features such as the stabilisation pole that give it more immersion whilst the base of the tipi also gives it a more realistic appearance as this makes it seem as if it is actually resting on hardened surface rather than an empty canvas with a textured background.
Moving back onto my diorama I have now begun adding the dirt texture, whilst at this time my base has not been fully finalised but has been applied a suitable texture which will see additional edits once I complete this next section of my diorama. For the dirt I have decided to use a rich dark colour that makes it stand out from the other textures on my product whilst some cosmetic features have been applied that include cracks in the dirt with solid rock appearing beneath which I have added to give my dirt texture a more realistic and eye catching appearance. Once I move on with this section I will implement more cracks onto my dirt whilst I am also considering the implementation of highlights that will improve the overall appearance of my model and make it look and feel like the design I have spoken about within my proposal.
In this next I am presenting the final version of my dioramas textures, the outcome that I was aiming towards contained a graphical appearance created through using flat textures that make the product appear vibrant and eye catching which for my diorama has been achieved through the use of utilising multiple brushes and colours that are available for using. To get this outcome I also went another step and played around with the layer settings where I was able to apply some textures onto my diorama and so for the base grass I have given it flat little bumps that make it seem more like an actual environment with some uneven surfaces whilst for the dirt I have applied a rock like appearance which presents it well alongside the flat colour scheme that I have chosen for it. Whilst designing the base I ran into some difficulty with blending a darkened patch of grass with the light shade and so to resolve this I selected the mixer brush tool and smudged over it which has now made it fit into my diorama and looks as if it is a natural feature. For the waterfall I have added a darkened highlight around it which I have done to give it the impression of having a river bank which makes it look as if it is not just resting on top of the base but rather has some depth to it.
After applying my bases textures for my dirt and grass my environment has now been finished save for some edits that I am considering implementing later, this has now allowed me to begin focusing on the individual assets of my scene starting with the tipis which are the most important and dominant asset in my diorama. I have voided the line art once again for the tipi and have given it a brownish tint for the outline which I have done just to tidy up the outline of the asset. For the detail of this tipi I have replicated the design from my individual asset to the best of my abilities which has worked surprisingly well as I was not expecting my tipi to look as refined as my detailed piece. Whilst there is a tipi present in my diorama I have spoken about including multiple and as many as 4 and so to follow through with this I will be making duplicates of this tipi and placing it in a different area in my scene most likely on the other side of the river that cuts through the center of my diorama, placing 2 like this prevents them from taking up a large space of the scene and restricting the view of some of my environmental assets. The next step for my diorama after finishing the placement and design of my tipis is to develop the firepit and find a suitable location for it before implementing the final assets and touches to my scene that will make up my finished product.
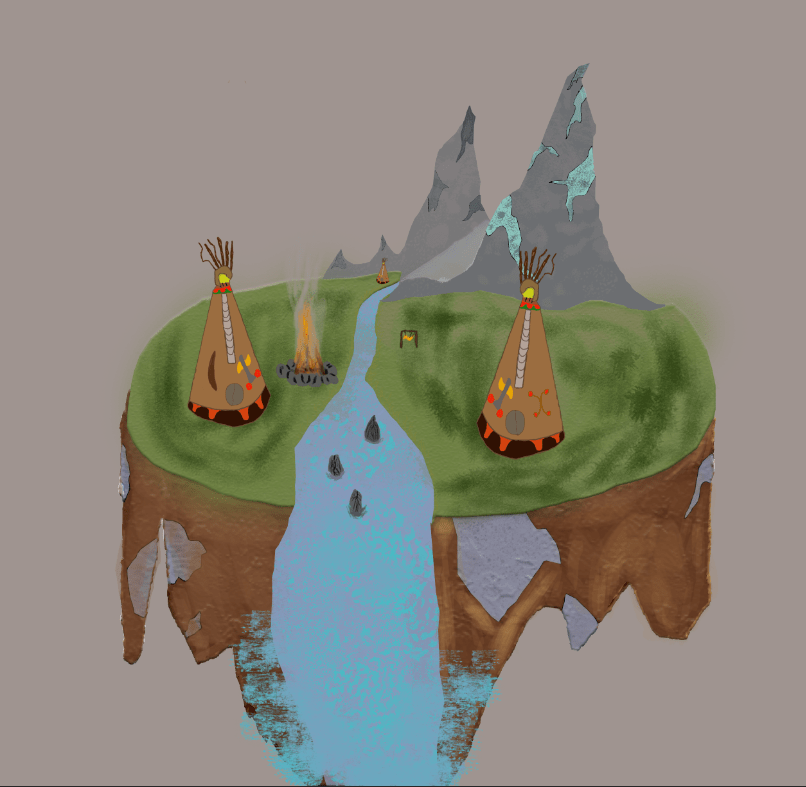
After performing all of my final edits my diorama is now complete presenting the idea that I spoke about and presented within my proposal. Despite spending a large amount of time deciding on a texture and appearance for my diorama I find myself feeling indifferent about the outcome as this project has been one that caused me alot of confusion and difficulty with the main reason for this being that it revolved around creating an environmental piece rather than being focused on character and asset design. For my final outcome the aspect that I am most pleased with is my mountains and base texture as using a flat colour has given me the graphical appearance that I was after whilst the grassy surface now has a rough layer to it that makes it seem more uneven which is a feature that I had been hoping to implement from the start. Overall this outcome is one that I do believe could be improved although the theme has not been the most stirring for myself and designing environments and dioramas is a specialism that I have not spent a sufficient amount of time practicing on to be able to develop an impressive and eye catching art piece. In my proposal I spoke of my diorama having a dark atmosphere but in my final product it is very vibrant and graphical with no dullness in sight and so the audience that I aimed my product towards may not be as gripped by this diorama as I hoped they might be.
